Saturday, March 3, 2012

Tangy Goats Milk Banana Creme Pie


So I'm a cheater... I prefer to get the pre-made crusts for this kind of thing. Alternatively, you can make your own if you want with graham crackers and butter in a food processor. This is a no fail delicious way to make a tangy, out of the ordinary dessert with many pre-made ingredients to save time. The goats milk and peanut butter bring out the nutty and creamyness that I find delicious in bananas.

Prep time: 10-20 min
Total Time 1.5-2 hours

What you'll need

  • Pre-made Graham Cracker crust
  • 5-6 Medium bananas ( 2 very ripe, 3-4 just ripe ) 
  • 1 package banana creme pudding 
  • 1 package vanilla pudding 
  • 2 tablespoons vanilla extract 
  • Here's the tang - substitute cow's milk for goat's milk! YUM! 
  • 1 tsp creamy peanut butter 
  • 10 cocoa puffs ( or just 1 tsp of dark cocoa powder ) 
  • Juice from 1 lemon 


  •  Layer the bottom with sliced bananas
  •  Mix the banana and vanilla puddings to pie specifications on the package - for Jello puddings, this is 2 3/4 cup goats milk for both packages ( not each! ).

  • In a separate bowl, mash the 2 very ripe bananas with the peanut butter and vanilla extract. 

  • Fold in the mashed banana mixture into the pudding mixture 

  • Cover the bottom layer of bananas with the crushed cocoa puffs or dark chocolate powder 
  • WARNING: Don't put whole cocoa puffs instead of crushed because they will turn into gummy balls of doom. NOT TASTY! 

  • Cover the cocoa puff layer with the prepared mixture of mashed bananas, peanut butter, vanilla, and pudding until it reaches slightly below the top part of the crust. Keep enough pudding for a second layer.
  • Cover the pudding layer with chopped up bananas -(save enough to create another layer on top)

  • Layer the remaining banana slices on top of the pudding and brush with diluted lemon juice - this will stop the bananas from turning brown. 

  • Cover in cling wrap and refrigerate for 1-2 hours
  • Cut and enjoy!
This can be made a day before, or can be frozen for an extra cool treat. If frozen, take out of the freezer for 1-2 hours prior to serving and put in the refrigerator. This is a nice way to get a creamy cool treat that isn't completely frozen. Not to mention: Pretty! 

Butternut Squash Breakfast Burritos


I was looking for a healthy alternative to grabbing breakfast at Starbucks before I went to work in the morning, so I put all the flavors that I love into one convenient, easy to heat, and easy to eat package. 

I just started working at a fast-paced start-up, here in the Bay Area, and I wanted something that would fill me up through long experiments and provide a good balance of carbs and protein. 

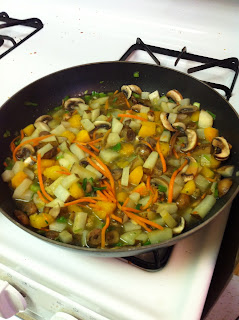
1) I threw some potatoes roughly cubed into a non-stick pan with shredded carrots and about a tablespoon of olive oil.


 2) On medium heat I browned the 1 large russet potatoe and warmed the 1/4 shredded carrots from the Trader Joes salad section. I prefer the carrot strings because they're versatile and add a nice color!


3) Who doesn't love chopped green onion?? 1 to 2 bunches does the trick - this is kind of up to you, a sweet yellow onion or caramelized white onion would also work well here. 


4) I like to switch things up when I'm in the kitchen: aka - I look what is around and kinda throw it in if I think it'll taste good - here come the  1/2 cup mushrooms ( 6-9 medium sized baby bellas )! 


5) The best "mistake" of all was adding the butternut squash which I had frozen down a week before after making a lovely roasted side dish. These were the cubes that were not previously cooked - they store well in a ziploc in the freezer for when you need some butternut squash ASAP.


6) After browning the potatoes and cooking down the onions a little, I added 2 cups of water with one chicken bullion cube from Knox to the mix, and cooked everything until the moisture was cooked off and the bullion was absorbed into the veggies. To this mix I also added a couple dashes of cayenne pepper, fresh cracked black pepper, a bay leaf, and 2 chopped cloves of garlic.


7) this is what it looks when things are still a bit raw- You want to take care not to overcook your veggies because if you're like me, you will be warming these things in the microwave - leaving a little bite to them will make them perfect when you heat them up.


 8) You have two options here, you can whip the 6 extra large eggs with a splash of milk and add them to the mixture, or you can cook the eggs separately and then mix everything together before putting the filling in the burrito. I prefer to add the eggs to a hot pan and cook them separately - it makes for the fluffiest eggs.


9) Scramble the eggs up until they are *just* about cooked- ie. mostly fluffy and cooked with just a little wetness to the eggs. Turn off and remove from heat. Sprinkle the eggs with your favorite cheese. I prefer some aged cheddar or a little bit of parmesan.


10) Mix in the veggies and fill a medium sized flour tortilla. Wrap the burrito in parchment paper and keep in the fridge or freezer. When you heat up the burrito ( about 2 min the the microwave ) keep it in the parchment paper. Your burrito will come out perfectly cooked, and the tortilla will be soft and delicious! The parchment works perfectly to seal in the vapors and keep the eggs moist - it also makes it easier to grab and go in the morning!

Ta da! What do you like to put in your breakfast burritos?